
Medical Service — MAUI App Implementation. Phase #1 — Implementing Page in XAML with inline data.
Under this phase, we will implement page UI with static data sources in XAML, using only a few converters and local models.
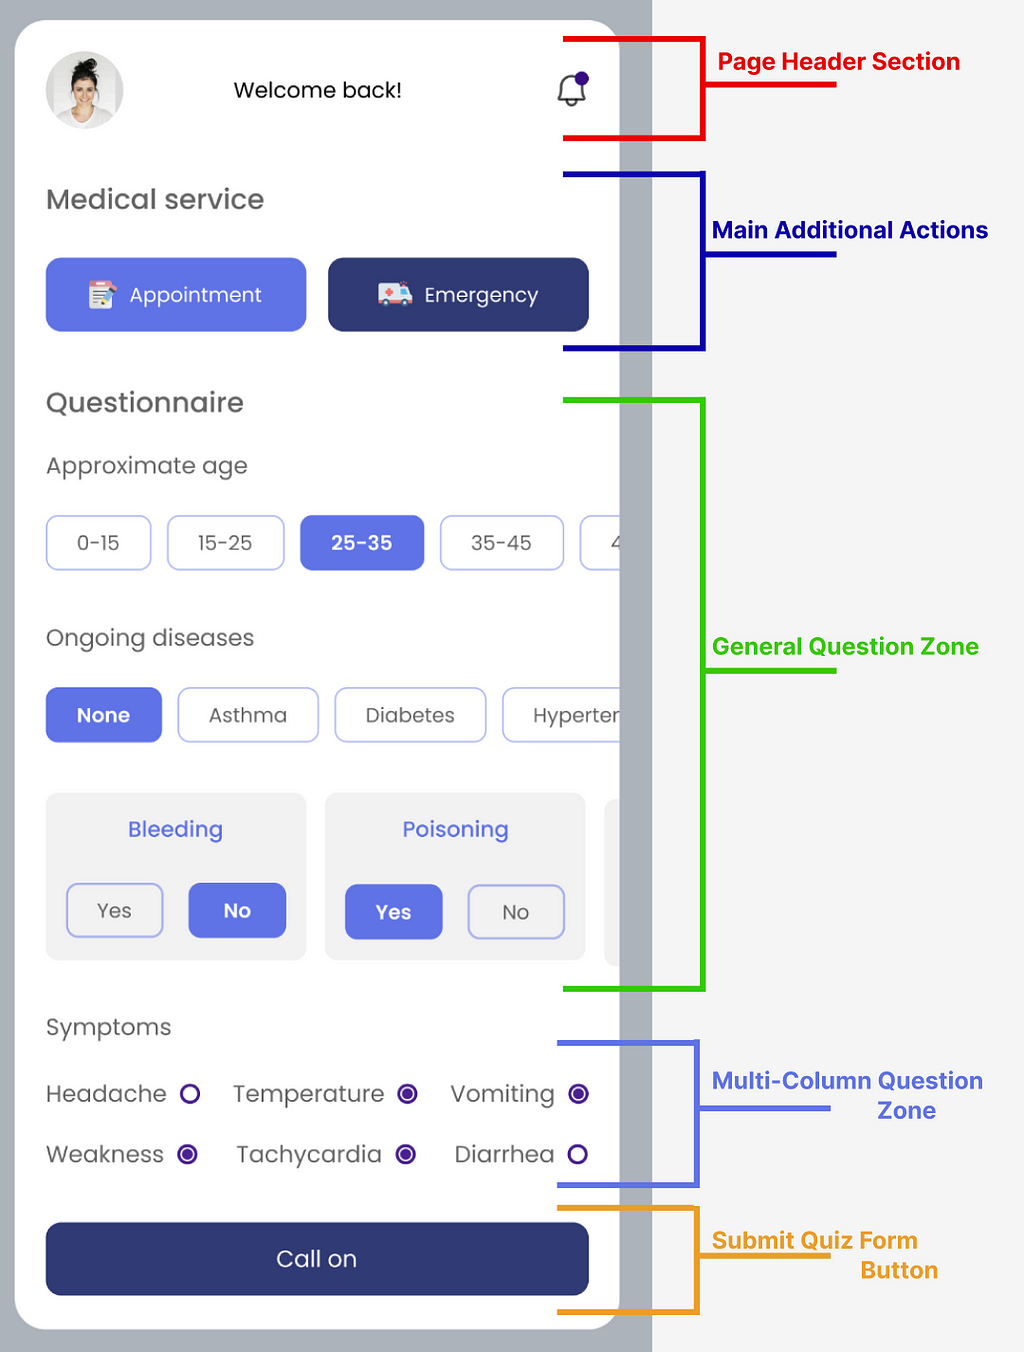
Hi Folks 👋. This time we will use only XAML to implement the entire UI according to the Dribbble design from Phase #0:
Medical Service — MAUI App Implementation. Phase #0 — Review Design
What you will find here:
- Implementation of each control, step-by-step.
- Using Converters for Selectable Components.
- Using Code-Behind as the resolver for events callback.
What we don’t focus on at this stage:
- Duplicated Code
- Resources for Styles and Colors
It’s terrible, but I created it to show you later how to refactor such crappy code into “good enterprise quality” code.
Source Code with GitKraken
Link to source code at GitHub:
GitHub - bbenetskyy/MAUI-Medical-service: Implementation of Medical Services Page
If you made it in MacOS, I strongly recommend using GitKraken. Using it will simplify branch managing; you can quickly review my changes or yours if you try to modify something. Also, later with the subsequent phases, you can see critical differences before and after merging branches.


Page Header Section

There are a few elements here, so we will focus on creating two Ellipses. The first will be used to Clip the profile image into a circle, while the second one will be to create a notification on the bell icon:
Main Additional Actions

As you can see, they are similar, and we will create a control for them later. We will pass into control the icon, text and background colour. But for now, we have duplicated our code twice. So here I will show the code for only one of them:
General Question Zone

We are lucky because we can reuse the same code for all selectable buttons. After all, they use the same radius, style and behaviour. An exception is “Yes-No” questions because we need to invalidate each button according to the questions.
Let’s start with creating models, they are needed to convert Background Color if an item is selected.
Now, we need to create converters. They will be used to change text and background colour. Separate for Selectable Model, where we will bind only IsSelected Property and separate for Questionable Model, where we will bind current answer and required one to match answers:
After all, that changes will get something like this in our Solution Explorer:

The next step is to create a selectable button and a “Yes-No” Quiz Card; place them into StackLayout with Bindable Item Source and Template. Values we also will bind in XAML. I know that it’s pretty rare and better to bind them from View Model. And it will be done in that way later, but now you can learn how to do it in XAML 😇, what a lovely day 🫠
And final thing — Tapped event Callback at Code Behind. We need to see which model was sent to us and who the sender is in the “Yes-No” Card Buttons case.
During refactoring, we will move dumb text-checking logic into control and replace it with enum checking, but for now, it’s more than enough for us.
Multi-Column Question Zone

Why did I name it? — All because we can’t just use Collection View(cause of scroll bug in MAUI) or Flex Layout(cause of not perfect alignment) and need sticky goes with three Stack Layouts inside one Grid with ColumnDefinitions="*,*,*", so all columns are the same; if we use the same layout inside Stacks, no matter which text we will place there 🥹. Later in the real app, we may get only a problem with data, but if we move it into custom control — we may add a special Data Manager who will be requested to solve it for us.
I’ll only insert one of the three stacks here because they’ll be the same:
Submit Quiz Form Button

There is nothing special here at the moment, but later we need to add validations and maybe make this button always visible on the screen — but this depends on business requirements and hard to identify it just by Dribbble Shot.
Thanks for reading, and see you in the next implementation Phase 😛
Medical Service — MAUI App Implementation. Phase #1 — Implementing Page in XAML with inline data. was originally published in Nerd For Tech on Medium, where people are continuing the conversation by highlighting and responding to this story.