Amazon Redshift is a massively parallel processing (MPP), fully managed petabyte-scale data warehouse that makes it simple and cost-effective to analyze all your data using existing business intelligence tools.
When businesses are modernizing their data warehousing solutions to Amazon Redshift, implementing additional data protection mechanisms for sensitive data, such as personally identifiable information (PII) or protected health information (PHI), is a common requirement, especially for those in highly regulated industries with strict data security and privacy mandates. Amazon Redshift provides role-based access control, row-level security, column-level security, and dynamic data masking, along with other database security features to enable organizations to enforce fine-grained data security.
Security-sensitive applications often require column-level (or field-level) encryption to enforce fine-grained protection of sensitive data on top of the default server-side encryption (namely data encryption at rest). In other words, sensitive data should be always encrypted on disk and remain encrypted in memory, until users with proper permissions request to decrypt the data. Column-level encryption provides an additional layer of security to protect your sensitive data throughout system processing so that only certain users or applications can access it. This encryption ensures that only authorized principals that need the data, and have the required credentials to decrypt it, are able to do so.
In this post, we demonstrate how you can implement your own column-level encryption mechanism in Amazon Redshift using AWS Glue to encrypt sensitive data before loading data into Amazon Redshift, and using AWS Lambda as a user-defined function (UDF) in Amazon Redshift to decrypt the data using standard SQL statements. Lambda UDFs can be written in any of the programming languages supported by Lambda, such as Java, Go, PowerShell, Node.js, C#, Python, Ruby, or a custom runtime. You can use Lambda UDFs in any SQL statement such as SELECT, UPDATE, INSERT, or DELETE, and in any clause of the SQL statements where scalar functions are allowed.
Solution overview
The following diagram describes the solution architecture.

To illustrate how to set up this architecture, we walk you through the following steps:
- We upload a sample data file containing synthetic PII data to an Amazon Simple Storage Service (Amazon S3) bucket.
- A sample 256-bit data encryption key is generated and securely stored using AWS Secrets Manager.
- An AWS Glue job reads the data file from the S3 bucket, retrieves the data encryption key from Secrets Manager, performs data encryption for the PII columns, and loads the processed dataset into an Amazon Redshift table.
- We create a Lambda function to reference the same data encryption key from Secrets Manager, and implement data decryption logic for the received payload data.
- The Lambda function is registered as a Lambda UDF with a proper AWS Identity and Access Management (IAM) role that the Amazon Redshift cluster is authorized to assume.
- We can validate the data decryption functionality by issuing sample queries using Amazon Redshift Query Editor v2.0. You may optionally choose to test it with your own SQL client or business intelligence tools.
Prerequisites
To deploy the solution, make sure to complete the following prerequisites:
- Have an AWS account. For this post, you configure the required AWS resources using AWS CloudFormation in the
us-east-2Region. - Have an IAM user with permissions to manage AWS resources including Amazon S3, AWS Glue, Amazon Redshift, Secrets Manager, Lambda, and AWS Cloud9.
Deploy the solution using AWS CloudFormation
Provision the required AWS resources using a CloudFormation template by completing the following steps:
- Sign in to your AWS account.
- Choose Launch Stack:

- Navigate to an AWS Region (for example,
us-east-2). - For Stack name, enter a name for the stack or leave as default (
aws-blog-redshift-column-level-encryption). - For RedshiftMasterUsername, enter a user name for the admin user account of the Amazon Redshift cluster or leave as default (
master). - For RedshiftMasterUserPassword, enter a strong password for the admin user account of the Amazon Redshift cluster.
- Select I acknowledge that AWS CloudFormation might create IAM resources.
- Choose Create stack.

The CloudFormation stack creation process takes around 5–10 minutes to complete.
- When the stack creation is complete, on the stack Outputs tab, record the values of the following:
AWSCloud9IDEAmazonS3BucketForDataUploadIAMRoleForRedshiftLambdaUDFLambdaFunctionName

Upload the sample data file to Amazon S3
To test the column-level encryption capability, you can download the sample synthetic data generated by Mockaroo. The sample dataset contains synthetic PII and sensitive fields such as phone number, email address, and credit card number. In this post, we demonstrate how to encrypt the credit card number field, but you can apply the same method to other PII fields according to your own requirements.

An AWS Cloud9 instance is provisioned for you during the CloudFormation stack setup. You may access the instance from the AWS Cloud9 console, or by visiting the URL obtained from the CloudFormation stack output with the key AWSCloud9IDE.

On the AWS Cloud9 terminal, copy the sample dataset to your S3 bucket by running the following command:

Generate a secret and secure it using Secrets Manager
We generate a 256-bit secret to be used as the data encryption key. Complete the following steps:
- Create a new file in the AWS Cloud9 environment.

- Enter the following code snippet. We use the cryptography package to create a secret, and use the AWS SDK for Python (Boto3) to securely store the secret value with Secrets Manager:
- Save the file with the file name
generate\_secret.py(or any desired name ending with.py).

- Install the required packages by running the following
pip installcommand in the terminal: - Run the Python script via the following command to generate the secret:

Create a target table in Amazon Redshift
A single-node Amazon Redshift cluster is provisioned for you during the CloudFormation stack setup. To create the target table for storing the dataset with encrypted PII columns, complete the following steps:
- On the Amazon Redshift console, navigate to the list of provisioned clusters, and choose your cluster.
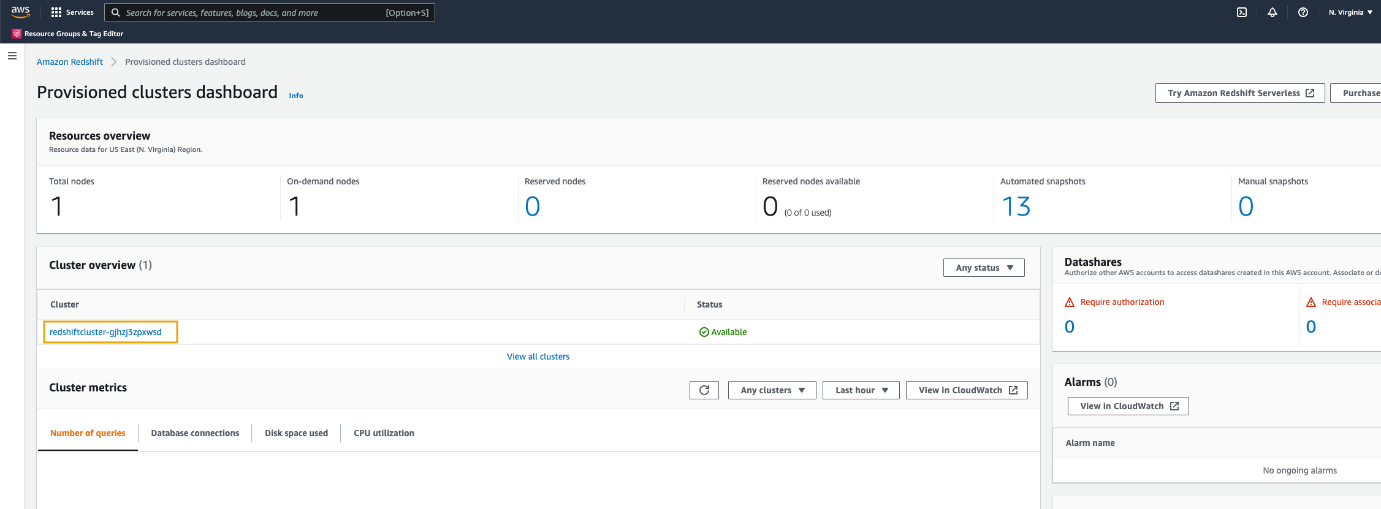
- To connect to the cluster, on the Query data drop-down menu, choose Query in query editor v2.

- If this is the first time you’re using the Amazon Redshift Query Editor V2, accept the default setting by choosing Configure account.

- To connect to the cluster, choose the cluster name.
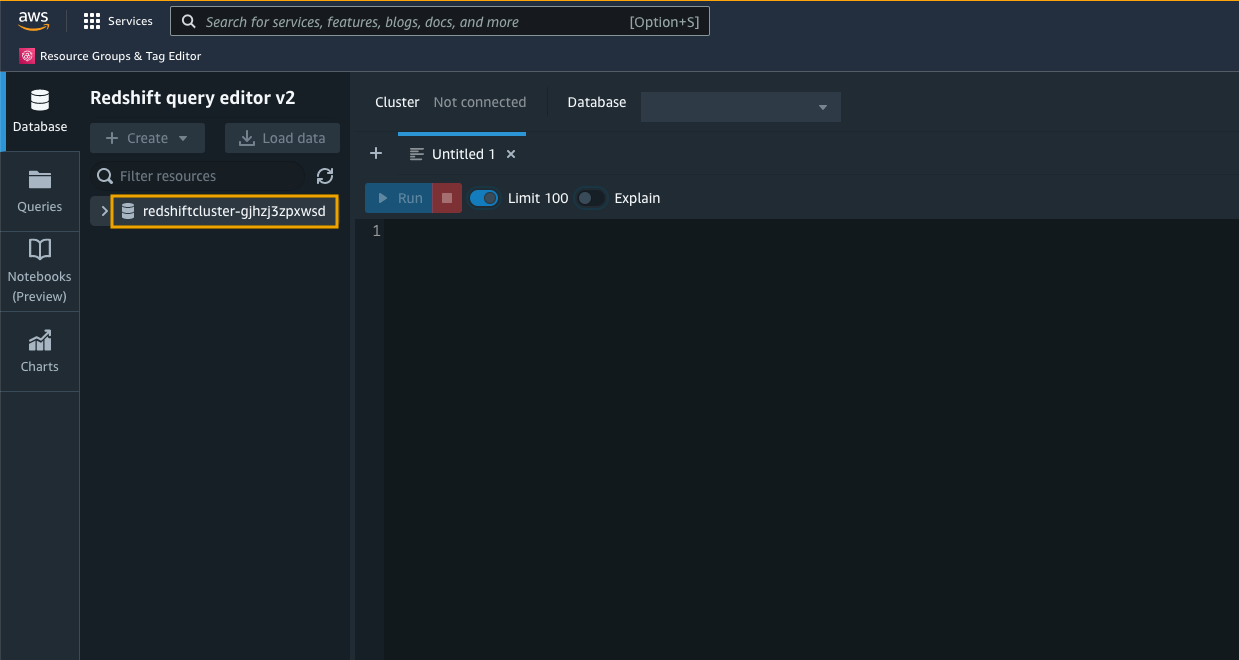
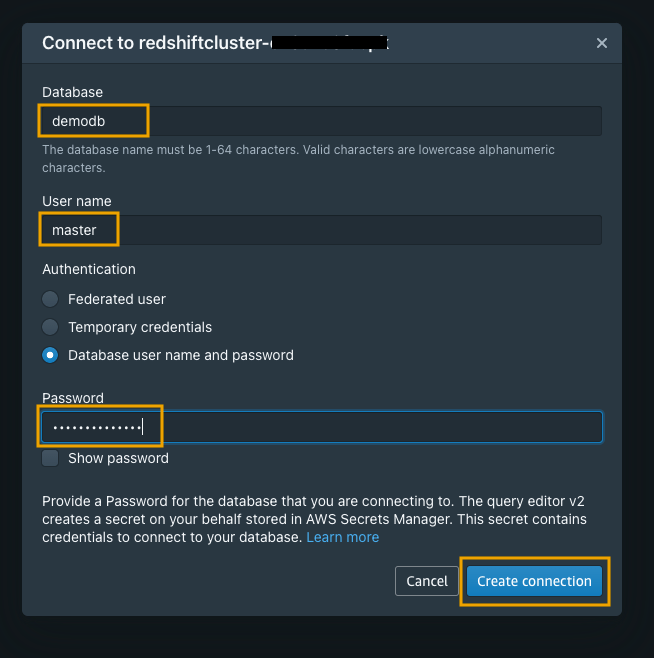
- For Database, enter
demodb. - For User name, enter
master. - For Password, enter your password.
You may need to change the user name and password according to your CloudFormation settings.
- Choose Create connection.
- In the query editor, run the following DDL command to create a table named
pii\_table:
We recommend using the smallest possible column size as a best practice, and you may need to modify these table definitions per your specific use case. Creating columns much larger than necessary will have an impact on the size of data tables and affect query performance.

Create the source and destination Data Catalog tables in AWS Glue
The CloudFormation stack provisioned two AWS Glue data crawlers: one for the Amazon S3 data source and one for the Amazon Redshift data source. To run the crawlers, complete the following steps:
- On the AWS Glue console, choose Crawlers in the navigation pane.

- Select the crawler named
glue-s3-crawler, then choose Run crawler to trigger the crawler job.

- Select the crawler named
glue-redshift-crawler, then choose Run crawler.

When the crawlers are complete, navigate to the Tables page to verify your results. You should see two tables registered under the demodb database.

Author an AWS Glue ETL job to perform data encryption
An AWS Glue job is provisioned for you as part of the CloudFormation stack setup, but the extract, transform, and load (ETL) script has not been created. We create and upload the ETL script to the /glue-script folder under the provisioned S3 bucket in order to run the AWS Glue job.
- Return to your AWS Cloud9 environment either via the AWS Cloud9 console, or by visiting the URL obtained from the CloudFormation stack output with the key
AWSCloud9IDE.
We use the Miscreant package for implementing a deterministic encryption using the AES-SIV encryption algorithm, which means that for any given plain text value, the generated encrypted value will be always the same. The benefit of using this encryption approach is to allow for point lookups, equality joins, grouping, and indexing on encrypted columns. However, you should also be aware of the potential security implication when applying deterministic encryption to low-cardinality data, such as gender, boolean values, and status flags.
- Create a new file in the AWS Cloud9 environment and enter the following code snippet:
- Save the script with the file name
pii-data-encryption.py.
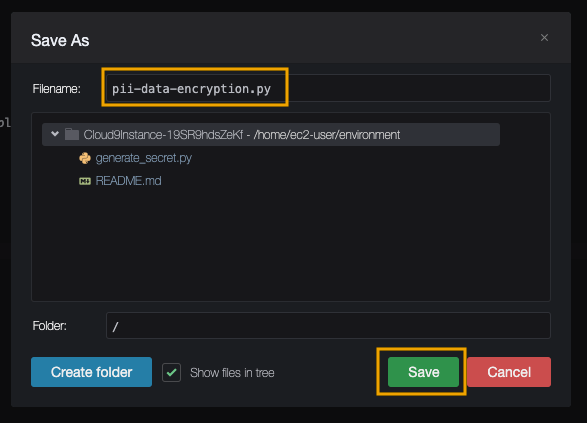
- Copy the script to the desired S3 bucket location by running the following command:

- To verify the script is uploaded successfully, navigate to the Jobs page on the AWS Glue console.You should be able to find a job named
pii-data-encryption-job.

- Choose Run to trigger the AWS Glue job.It will first read the source data from the S3 bucket registered in the AWS Glue Data Catalog, then apply column mappings to transform data into the expected data types, followed by performing PII fields encryption, and finally loading the encrypted data into the target Redshift table. The whole process should be completed within 5 minutes for this sample dataset.
 You can switch to the Runs tab to monitor the job status.

Configure a Lambda function to perform data decryption
A Lambda function with the data decryption logic is deployed for you during the CloudFormation stack setup. You can find the function on the Lambda console.

The following is the Python code used in the Lambda function:
If you want to deploy the Lambda function on your own, make sure to include the Miscreant package in your deployment package.
Register a Lambda UDF in Amazon Redshift
You can create Lambda UDFs that use custom functions defined in Lambda as part of your SQL queries. Lambda UDFs are managed in Lambda, and you can control the access privileges to invoke these UDFs in Amazon Redshift.
- Navigate back to the Amazon Redshift Query Editor V2 to register the Lambda UDF.
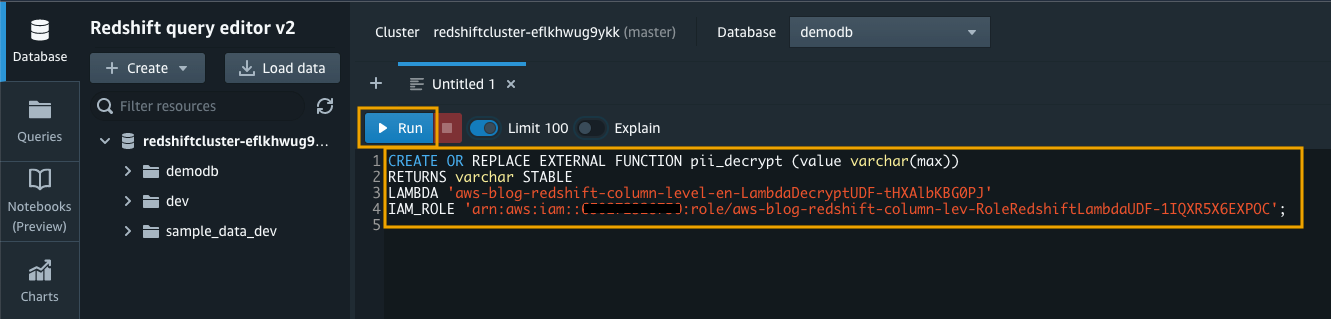
- Use the
CREATE EXTERNAL FUNCTIONcommand and provide an IAM role that the Amazon Redshift cluster is authorized to assume and make calls to Lambda:
You can find the Lambda name and Amazon Redshift IAM role on the CloudFormation stack Outputs tab:
LambdaFunctionNameIAMRoleForRedshiftLambdaUDF

Validate the column-level encryption functionality in Amazon Redshift
By default, permission to run new Lambda UDFs is granted to PUBLIC. To restrict usage of the newly created UDF, revoke the permission from PUBLIC and then grant the privilege to specific users or groups. To learn more about Lambda UDF security and privileges, see Managing Lambda UDF security and privileges.
You must be a superuser or have the sys:secadmin role to run the following SQL statements:
First, we run a SELECT statement to verify that our highly sensitive data field, in this case the registered\_credit\_card column, is now encrypted in the Amazon Redshift table:

For regular database users who have not been granted the permission to use the Lambda UDF, they will see a permission denied error when they try to use the pii\_decrypt() function:

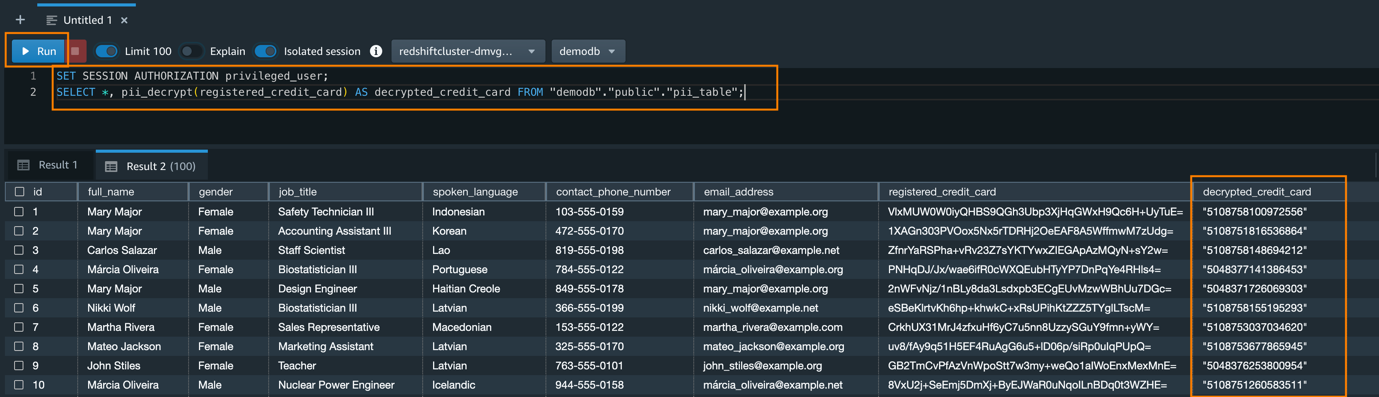
For privileged database users who have been granted the permission to use the Lambda UDF for decrypting the data, they can issue a SQL statement using the pii\_decrypt() function:
The original registered\_credit\_card values can be successfully retrieved, as shown in the decrypted\_credit\_card column.
Cleaning up
To avoid incurring future charges, make sure to clean up all the AWS resources that you created as part of this post.
You can delete the CloudFormation stack on the AWS CloudFormation console or via the AWS Command Line Interface (AWS CLI). The default stack name is aws-blog-redshift-column-level-encryption.
Conclusion
In this post, we demonstrated how to implement a custom column-level encryption solution for Amazon Redshift, which provides an additional layer of protection for sensitive data stored on the cloud data warehouse. The CloudFormation template gives you an easy way to set up the data pipeline, which you can further customize for your specific business scenarios. You can also modify the AWS Glue ETL code to encrypt multiple data fields at the same time, and to use different data encryption keys for different columns for enhanced data security. With this solution, you can limit the occasions where human actors can access sensitive data stored in plain text on the data warehouse.
You can learn more about this solution and the source code by visiting the GitHub repository. To learn more about how to use Amazon Redshift UDFs to solve different business problems, refer to Example uses of user-defined functions (UDFs) and Amazon Redshift UDFs.
About the Author
 Aaron Chong is an Enterprise Solutions Architect at Amazon Web Services Hong Kong. He specializes in the data analytics domain, and works with a wide range of customers to build big data analytics platforms, modernize data engineering practices, and advocate AI/ML democratization.